We are so pleased to welcome Popshop Style into the retail space starting winter 2013.
Now that phase 1 of the renovation is essentially complete, we look forward to renting out the beautiful back office space to a lucky tenant, before embarking on phase 2, our apartment.
Pictures will be posted soon.
Tuesday, October 15, 2013
Monday, September 16, 2013
Close to Done with Phase One
The commercial floor is almost complete!
Electric, check
Plumbing, check
Drywall, check
Floors, check
The couple of items remaining include renovating the front doors and fixing some of the interior windows.
One upgrade that makes the building just shine is the front window. It used to be framed in aluminum and divided into three panes. The aluminum was curling up and disintegrating.
Rick wanted to replace the window with one pane and frame it with wood. So we ordered the glass and removed the old window.
We had to cover the window opening for safety because it took about 2 weeks to arrive.
The day the glass arrived felt somewhat ceremonial because of the fragile handling required. It took 4 guys to set it in properly.
Rick stained the frame around the window to match the stain that we'll be applying to the front doors. The new window really makes the facade so much warmer and friendlier.
Electric, check
Plumbing, check
Drywall, check
Floors, check
The couple of items remaining include renovating the front doors and fixing some of the interior windows.
One upgrade that makes the building just shine is the front window. It used to be framed in aluminum and divided into three panes. The aluminum was curling up and disintegrating.
Rick wanted to replace the window with one pane and frame it with wood. So we ordered the glass and removed the old window.
We had to cover the window opening for safety because it took about 2 weeks to arrive.
The day the glass arrived felt somewhat ceremonial because of the fragile handling required. It took 4 guys to set it in properly.
Once the glass was set, we framed the window with cedar wood.
Rick stained the frame around the window to match the stain that we'll be applying to the front doors. The new window really makes the facade so much warmer and friendlier.
Saturday, July 27, 2013
Radiators and floors
The contractor left us a nice surprise that we noticed this morning. They removed the paint on the three radiators in the office space. We weren't planning on having the paint removed till a future phase, because we assumed we would either need to have them sandblasted while in place or we would have had to remove them and get them dipped, like we did the doors.
![]() |
Pre-demo image showing radiator with old paint |
![]() |
Radiator from previous image with paint removed |
The old linoleum has been lifted off the floors, exposing the fir wood floors beneath. The linoleum came off fairly easy in the back office and the hallway leading to it, without leaving mastic or residue. In the front retail space, though, there's mastic stuff that we'll need to remove.
Wednesday, July 17, 2013
Front door paint removal
We think the two front doors are original to the building and we would like to find ways to strip the paint on the doors to expose the wood doors with some stain.
We have a black and white image of one of the doors from the 30's that shows it painted white with a window on the top panel. Ideally, we'd like to put the glass back into both front doors to bring in more natural lighting and connect the exterior with the entry space.
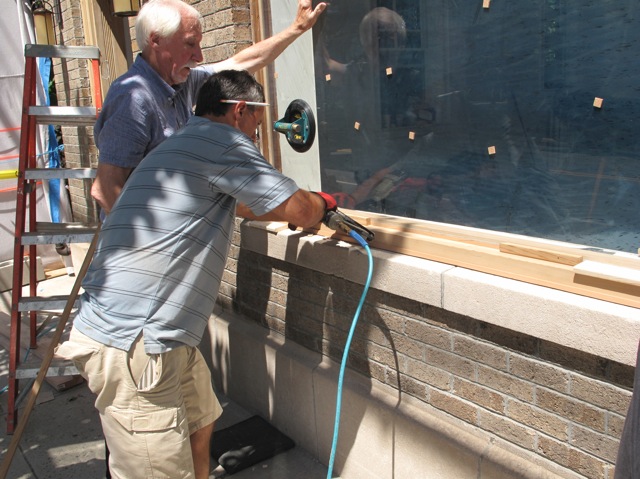
Rick started experimenting with a product to strip the paint off the frame. He started with a test spot and after some trials, found a technique that removed most of the paint, requiring some sanding afterwards to cleanup the remaining spots.
After some sweat equity, paint was removed off of both door frames. The do-it-yourself paint stripper may be too time intensive and laborious for both doors, so we're investigating possibilities for taking the doors for the paint to be removed using commercial paint stripper.
Once the paint is removed from both doors and frames, we'd like to sand and stain the doors to show the natural wood next to the brick.
We have a black and white image of one of the doors from the 30's that shows it painted white with a window on the top panel. Ideally, we'd like to put the glass back into both front doors to bring in more natural lighting and connect the exterior with the entry space.
Front doors look like this with paint |
After some sweat equity, paint was removed off of both door frames. The do-it-yourself paint stripper may be too time intensive and laborious for both doors, so we're investigating possibilities for taking the doors for the paint to be removed using commercial paint stripper.
Front door with paint removed from frame |
Once the paint is removed from both doors and frames, we'd like to sand and stain the doors to show the natural wood next to the brick.
Tuesday, July 9, 2013
Front Lamps
The electrical inspection has passed and now we're looking ahead at the type of light fixtures for the front entrances.
Originally we were thinking of goosenecks lamps on top of each door, like in this rendition.
After some thought we decided to put one light on each side of each door because we liked the idea based on seeing examples from some of our neighbors, like the Village hall and a few restaurants in the area.
We paid a visit to Klaff's, a home design store in town with an extensive lighting section, and chose lamps with yellow/orange glass to suspend on each side of the doors. Rick printed the image of the lamp to the building scale to help us better imagine what they would like.
![]() |
Printed image of lamp |
Printed paper lamps on building for perspective |
Roof Replacement
Rather than replace the entire roof, to save money Rick and the contractors marked off areas that needed to be selectively replaced.
The week the roof was being replaced, we had unusual torrents of rain and thunderstorms, so the project was done in fits and spurts. With signs of a storm, the contractor would wrap up the roof and come back during the next dry spell.
In addition, the masonry parapet wall at the front of the building was in bad shape. The contractor finished off the wall with stucco to protect it.
The contractor also added a nice cap to the parapet roofing edge.
The week the roof was being replaced, we had unusual torrents of rain and thunderstorms, so the project was done in fits and spurts. With signs of a storm, the contractor would wrap up the roof and come back during the next dry spell.
Protection board being fastened on |
In addition, the masonry parapet wall at the front of the building was in bad shape. The contractor finished off the wall with stucco to protect it.
The contractor also added a nice cap to the parapet roofing edge.
The roof is now in good condition to protect the building from bad weather and the pesky squirrels that would occasionally visit.
Monday, June 10, 2013
Demolition starts
On Friday, June 7th the contractors started demolition of the commercial floor. Here's a short video to commemorate the long-awaited first swing.
![]() |
Organized piles of demo'd walls |
The walls are selectively removed to create a large office in back connected to one of the bathrooms with a separation from the front retail space.
Office in back |
![]() |
Front retail space as seen from office |
In some locations, we're leaving the existing, original wall trim...
![]() |
Existing baseboard |
Including the trim around the windows.
![]() |
Plaster removed around windows |
We asked the contractor to remove the plaster on the middle floor, since they were already mobilized on-site. While doing that, they ran across underground conduits leading into the building. We believe these were originally meant to carry telephone wires that would have run into the building if the original plan to make it a telephone switching building had occurred.
Conduits for telephone wires? |
Subscribe to:
Posts (Atom)